Computer Tricks

"Getting familiar with Computer tricks not only help you get the work done faster, but also more efficient. If your daily job rely heavily on using Windows, here are some Windows tricks you might want to check out".

Wednesday, 25 May 2016

Enable Status Bar in Notepad on Windows 10/8/7

If you use the Notepad frequently, you may have noticed that the Status Bar option under View is always greyed out or disabled. In this post we will see the reason for this and how you can enable Status Bar in Notepad - via the Notepad itself or with a registry tweak.

The Status Bar appear at the bottom of the Notepad and gives information like the number of lines and the number of columns, the text is occupying.

Now if you click on View, and you will see that the status Bar option is greyed out. Click on Format and then uncheck the Word Wrap option. Now go back and you will see that the Status Bar option is available and you can enable it.

 Enable Status Bar In Notepad 

You can via the Windows Registry force Notepad to always have the Status Bar enabled.
For this, press window key + R after that, Type regedit and navigate to the following key:

 HKEY_CURRENT_USER\Software\Microsoft\Notepad 

Here change the Status Bar DWORD value from 0 to 1. Press F5 to refresh the Registry.


Now open Notepad. You can see the Status Bar enabled.


Looking for more check out these Notepad Trick. Share to other and Follow for Update, Thankyou!
Posted by Unknown at 11:31:00 No comments:
Email ThisBlogThis!Share to XShare to FacebookShare to Pinterest

How To Reset Notepad To Default Settings on Windows 10

Reset Notepad To Default Settings

The default font in Notepad in Windows 10, is Consolas with Regular style, and font size 11. Word Wrap and Status Bar are disabled. To reset all Notepad settings, from the WinX menu, open Run Box, type "regedit" and hit Enter to open the Registry Editor.

But before you begin, you may want to create a system restore point and /or backup your Registry.
Next, navigate to the following key:
HKEY_CURRENT_USER\Software\Microsoft\Notepad

Now in the left pane itself, right-click on Notepad and select Delete.


This will delete all the saved settings of Notepad, that you can see in the right pane.

By doing this, your Notepad will be reset to its default settings.

For more, Then these Notepad Tricks. Share to other and Follow for Update, Thankyou!
Posted by Unknown at 11:02:00 No comments:
Email ThisBlogThis!Share to XShare to FacebookShare to Pinterest

Tuesday, 24 May 2016

Notepad Tricks For Windows Users.

The Notepad in Windows is one of the most used programs. It is a very basic text editor you can use for simple documents. Lets us have a look at some Notepad tricks that will help you.


Notepad is a built-in basic text editor included in the Windows Operating System, which is also used to save certain file formats like Registry files, Batch files, Script files, etc.

1:To add a date and time stamp to an open Notepad, simply hit F5.

You will see it displayed as : 24:25 24-05-2016

2:At the first line of a Notepad file, type: .LOG   

This will put a timestamp at the end of the file, every time you open it.

3:To change the font used in Notepad, click Format > Font and select the font and style you prefer!

4:To customize the Page setup, size & side margins, click on File > page Setup to see the options.

5:The Status Bar appear at the bottom of the Notepad and gives the information like the number of line   and the number of columns, the text is occupying. show to enable Status Bar in Notepad.

6:You can remove or change Notepad headers and folders. If you open Notepad > File > Page Setup,     you will see that the default header and footer settings are:
  • Headers: &f
  • Footers: Page & p

These commands will display the title of the document on the top & page number at the bottom.

To change headers and footers, you can use the following commands in the Header & Footer fields given in the Page Setup Box:

  • &l----->Left-align the characters that follow
  • &c----->Centre the characters that follow
  • &r----->Right-align the characters that follow
  • &d----->Print the current date 
  • &t------>Print the current time 
  • &f------>Print the name of the document
  • &p------>Print the page number

If you leave the Header or Footer text box empty, no header or footer will print. You can also insert words into the Header and Footer text box and they will print in their appropriate position. All header
and footer setting must be entered manually each time you want to print a document. These settings can't be saved.

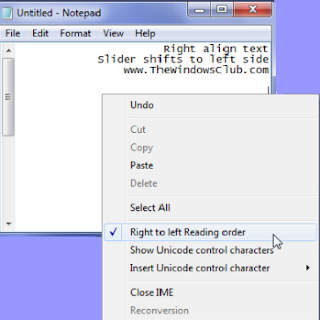
7:To make the text align to the right side, right click inside the Notepad and select Right to left reading order.


8:If your Notepad is working properly, this is how you can reset Notepad to default settings. Share to others and Follow for Update, Thankyou!
Posted by Unknown at 22:48:00 No comments:
Email ThisBlogThis!Share to XShare to FacebookShare to Pinterest

Sunday, 22 May 2016

List Of Command Prompt Keyboard Shortcuts For Windows 10

If you use the Command Line frequently, then here is list of Command Prompt Keyboard Shortcuts for windows 10, that will help you work quicker.
Command Prompt Keyboard shortcuts

 Keyboard Shortcuts                        Action 

Ctrl + C ------------------------->Copy the selected text.

Ctrl + V ------------------------->Paste the select text.
Ctrl + M ------------------------>Enter Mark mode
Alt + selection key ------------->Begin selection in block mode.
Arrow keys --------------------->Move the cursor in the direction specified. 
Page up ------------------------->Move the cursor by one page up.
Page down --------------------->Move the cursor by one page down.
Ctrl+ Home -------------------->Move the cursor to the beginning of the buffer.
Ctrl + End ---------------------->Move the cursor to the end of the buffer.
Ctrl + Up arrow ---------------->Move up one line in the output history.
Ctrl + Down arrow ------------->Move down one line in the output history.
Ctrl+Home ---------------------->If the command line is empty, move the viewport to the top of the buffer.Otherwise, delete all the characters to the left of the cursor in the command line.(History navigation)
Ctrl + End ----------------------->If the command line is empty, move the viewport to the command line. Otherwise, delete all the characters to the right of the cursor in the command line.(History navigation)
If you are looking for more tricks to work better with CMD, these Command Prompt will help you get started.
Posted by Unknown at 14:06:00 No comments:
Email ThisBlogThis!Share to XShare to FacebookShare to Pinterest

Saturday, 21 May 2016

How To Hide Hard Drives( C:, D:, E:. etc.) Of Your Computer !

You have noted of hiding a Windows folder in Windows but have you ever noted of hiding the entire Hard Drive ? It is a easy way by which you can hide hard disk drive of your computer and make fool of your friends !!
There are many ways to hide a drive in Windows. It is through Disk Management, using Group Policy, through Windows Registry or by using Diskpart command in CMD. We will see these ways step by step, so that you can implement the same to hide a drive in Windows.

 Hide Drive using Disk Management 


  • If you want to hide a drive in Windows through Disk Management, you need to right-click on My Computer and then click Manage.
  • In Computer Management Console open Storage by double clicking on it.


  • Now, double-click on Disk Management Snap-in.


  • Disk Management Console opens up and you can see all drives of your PC.


  • Choose the drive which you want to hide and right click on it. Choose Change Letter and Paths and click on Remove button.


  • If it asks for confirmation, say 'Yes'. Now, you can't see the hidden drive in My Computer.


 Hide Drive Using Windows Registry 

We will use NODrives  registry key to hide a drive in Windows. As we add a key to the registry, I suggest you to take the backup of you registry.Once it is done, Proceed!

  • Press Windows Key + R, type 'regedit' and hit enter. It asks for confirmation, say 'yes'. Now, registry Editor Console opens up. Navigate to below path,

 Hey_LOCAL_MACHINE > Software > Microsoft > Windows > CurrentVersion > Explorer 


  • Here, We are going to create a new DWORD value, so right click on Explorer and choose New > DWORD value (32-bit).

  • Give the name as 'NoDrives' and double click on it, to change the properties. Now, console opens where we need to enter values. In value data, choose the one based on the drive you want to hide. Each drive letter has unique value and values are as below,
A: 1, B: 2, C: 4, D: 8, E: 16, F: 32, G: 64, H:128,...., All: 67108863 or 3FFFFFF(hexadecimal).

  • Choose the corresponding value for the drive and enter that value in 'value data'. Choose 'Decimal' for Base section. As I want to hide, drive 'D', I am entering the value as  '8'.


  • If you want to hide two drives, say for example 'D' and 'E', you can enter value one value as '24' (D = 8 , and E = 16) and it hides both the drives.
  • Restart your computer and your drive in hidden now.

If you are supposed to get the drive back, change the value to Zero or you can even delete the 'NoDrives' registry key.


 Hide Drive using CMD 


  • Open an command prompt, type Diskpart and hit Enter. 
  • Type List Volume and hit Enter. 
  • Now type select and the numeral against the letter of the Drive (eg. it could be D Drive), which you want to hide For instance it could be Select Volume 2 Hit Enter.
  • At Last, Type Remove Letter D and hit Enter.
  • You will see a message - Diskpart successfully removed the drive letter or mount point.


To show the hidden drive, follow steps 1,2,3 mentioned above.
Now type Assign Letter D and hit Enter. This will show the drive in Explorer.

These are the ways you can hide a drive in Windows.
Posted by Unknown at 16:48:00 No comments:
Email ThisBlogThis!Share to XShare to FacebookShare to Pinterest

Friday, 20 May 2016

Web Browsing Trick

Automatically and www. and .com to a URL: You can shave off a couple of seconds typing in a URL by simply click CTRL + Enter after you type the name of the site. Need .net instead of .com, press CTRL + Shift +Enter instead.

Jump to address bar: There are a number of ways to jump right to the address bar from anywhere in browser. Pressing CTRL + L, F6, and ALT + D all accomplish this goal.
Bring back a closed tab: We covered this already, but it's super useful. Accidentally closed a tab? Simply press CTRL + Shift + T to reopen the most recently closed tab and get back to what you were doing.

Use  Private Browsing: The uses for not having cookies and history saved are obvious for certain activities, you know, like shopping for gifts on a shared computer. Pressing CTRL + Shift + N will launch a new private in Chrome, CTRL + Shift + P will do it in Firefox and Internet Explorer.


Cycle Through Open tabs: Pressing CTRL + Tab while in a browser will flip between each one. This can be much faster than moving the mouse and  clicking on a tab. CTRL + NUM (1,2,3,4, n..) will also take you to certain tab in that numeric order.

Posted by Unknown at 11:26:00 No comments:
Email ThisBlogThis!Share to XShare to FacebookShare to Pinterest

Thursday, 19 May 2016

Uninstall Programs Easily With These Third-Party Uninstallers

In Windows one can not just click on Delete to Uninstall a program in Windows, you have to run the Software  Uninstaller or you can do it with Control Panel. Many a times People Find it Difficult to Uninstall a Specific Program. You might not be aware of the fact that Uninstalling Programs through Control panel does not always uninstall it Completely.Traces  are still left in Registry and Program Files Folder.
To overcome this Problem and Uninstall Programs once and for all, you need to use third party Uninstallers. I will mention 2 Best uninstallers which will help you to Uninstall any program completely and easily including the registry entries. These Uninstallers also comes with additional features such as batch uninstall, program sorting which makes them much easier to use.

Three Third-Party Uninstallers to Uninstall Programs In Windows

  • Iobit Uninstaller: Iobit Uninstaller is my Preferred Program to Uninstall Applications from my PC without keeping any Leftovers. Iobit uninstaller 3 is Free to use and comes with beautiful and user Friendly Interface, Big advantage of Iobit Uninstaller 3 is the fact that it is Portable and Light which means you don't need to Install this program and can carry it anywhere you want. Iobit Uninstaller 3 also Creates System Restore Point for you, it shows you the list of  programs   that has been Installed on your Windows so that you can easily Uninstall them, or can even Batch Uninstall Programs to speedup the Process.
                   Download From Here Click
  • Comodo Programs Manager: Comodo Programs Manager is another program to Uninstall Programs from Windows Easily. Besides Uninstalling Programs, Comodo Program Manager comes with many more useful features. It is simple to use as it comes with user friendly interface. This program also helps you yo remove Drivers, services ad Windows Updates. Comodo Program Manager is always Active and running in the background, so whenever you try to run a setup, it checks for malwares using their Cloud Technology. 
                   Download From Here Click


  • Revo Uninstaller: Revo Uninstaller is one of the Popular Third-Party software that is used by many to Uninstall Programs. Revo Uninstaller is fast and reliable, you can uninstall single and multiple programs easily and fast. It is not available to download for free from their official site but you can enjoy all the features by downloading 30 days free trial pack. You may think of purchasing it none of the above two programs Interests you which are free and much better.
                  Download From Here Click

Posted by Unknown at 14:37:00 No comments:
Email ThisBlogThis!Share to XShare to FacebookShare to Pinterest

Wednesday, 18 May 2016

Windows 10 - How to enter BIOS configuration?

 Refer To The Step To Enter BIOS Configuration 

There are two ways to enter the UEFI (BIOS) on your computer. You can use either method listed below to enter the UEFI (BIOS) setup.

 Method 1: 

1: Hold and Press [Shift] then off the system.


2: Press and hold the F2 button  then click the Power button. Do Not Release the F2 button until the BIOS screen display.


3: You can find the BIOS configuration.


 Method 2: 

  1. Click the Start StartMenu and select Settings.
  2. Select Update and Security.
  3. Click Recovery.
  4. Under Advanced startup, click Restart Now. The system will restart and show the Windows 10 boot menu.
  5. Select Troubleshoot.
  6. Choose Advanced Options.
  7. Select UEFI Firmware Settings.
  8. Click Restart to restart the system and enter UEFI (BIOS).
For More New Trick visit Us: www.makeeasycomputer.blogspot.in
Posted by Unknown at 11:14:00 No comments:
Email ThisBlogThis!Share to XShare to FacebookShare to Pinterest

Sunday, 15 May 2016

Windows 10 Makes Easier

Some Tips and Tricks To Make Your Experience With Windows 10 Easier


Windows 10 is a personal computer operating system developed and released by Microsoft as part of the Windows NT family of operating systems. It was officially unveiled in September 2014 following a brief demo at Build 2014. The first version of the operating system entered a public beta testing process in October 2014, leading up to its consumer release on July 29, 2015.


 Change the taskbar color 

  1. Right-click the desktop and choose Personalize.
  2. Select Colors.
  3. Choose your desired color; this will change both the taskbar and Start Menu.
  4. Want the highlights to match your backdrop? Turn on the "Automatically pick an accent color...." option.
 Turn on the Start Screen 
  1. Right-click the desktop and choose Personalize.
  2. Select Start.
  3. Turn on "Use Start full screen".
 Add folders to the Start Menu 
  1. Right-click the desktop and choose Personalize.
  2. Select Start.
  3. Click "Choose which folders appear on Start".
 Remove tiles from Start Menu 
  1. Click the Start button. 
  2. Right-click the tile you want removed.
  3. Choose "Unpin from Start".
 Change the Default Browse r
  1. Click the Start button.
  2. Click Settings. 
  3. Click System.
  4. Click "Default Apps".
  5. Scroll down and select "Web Browser".
  6. Choose your desired web Browser.

 Turn on Inactive Page Scrolling 
  1. Click Start Button. 
  2. Click Settings.
  3. Click Devices.
  4. Select "Mouse & touchpad".
  5. Make sure "Scroll inactive windows when I hover over them" is checked.
 Turn on "Hey Cortana" 
  1. Click within the search field on the taskbar.
  2. Click Notebook.
  3. Click Settings.
  4. Turn on "Hey Cortana".
  5. Optional: Click the "Learn my Voice" button so that Cortana can become familiar with your voice.
 Clear Cortana's Information Stash 
  1. Log into http://www.bing.com/account/personalization.
  2. Here you can clear interests, Saved places, search history, other Cortana data, personalized speech, inking, and typing.
Change Notification Behaviour
  1. Click the Start button. 
  2. Click Settings.
  3. Click System.
  4. Click "Notification & actions".
  5. Choose a desired settings for notifications.
 Disable automatic restarts 
  1. Click the Start button.
  2. Click Settings.
  3. Click "Update & Security".
  4. Click Windows update.
  5. Click "Advanced Options".
  6. Choose "Notify to schedule restart" from drop-down menu.
 Create GodMode Tool 
  1. Right-click the desktop.
  2. Click New.
  3. Click Folder.
  4. Rename folder to this: GodMode.{ED7BA470-8E54-465E-825C-99712043E01C}
  5. You should now have an icon labeled GodMode.
 Disible Wi-Fi Sharing 
  1. Click theStart button.
  2. Clilck Settings.
  3. Click "Network & Internet".
  4. Scroll down and click "Manage Wi-Fi Settings".
  5. Uncheck everything listed under "For networks I select, share them with my...."
 Manage Your Privacy Settings 
  1. Click the Start Button.
  2. Click Settings.
  3. Click Privacy.
  4. Privacy is divided into 13 sections. Turn off anything that may look intrusive, such as "Send Microsoft info about how I write...."
 Turn on Battery Saver 
  1. Click the Start Button. 
  2. Click Settings. 
  3. Click System.
  4. Clilck "Battery Saver".
 Uninstall a Program 
  1. Right-click the Start Button.
  2. Click "Programs & Features".
  3. Choose the program to uninstall.
 Edit Your Microsoft Account 
  1. Click the Start Button. 
  2. Click Settings.
  3. Click Accounts.
  4. Click "Your Account" and make your changes.
 Change Default Search Engine in Edge 
  1. Open the Edge browser. 
  2. Click the button with three dots.
  3. Choose Settings.
  4. Choose "View Advanced Settings".
  5. Choose a search engine in the "Search in the address bar with" drop-down menu.
 Unlock "VERY HIGH" IN XBOX APP STREAMING SETTINGS 
  1. Open Explorer and paste the following: %localappdata%\Packages\
  2. Open the "Microsoft.XboxApp" folder.
  3. Open the "LocalState" folder.
  4. Open the "userconsoledata" file with a text editor.
  5. Change the "IsInternalPreview" variable from "false" to "true", then save.
  6. Open Xbox App and connect to the Xbox One.
  7. Click "Settings" then "Game streaming".
  8. Select "Very High" as shown above.
 Other Shortcuts For Window 10 
WIN key: Open Start Menu
WIN + G: Open the Game Bar
WIN + X: Open the Start Button context Menu
WIN + K: Connect to wireless devices
WIN + H: Share content
WIN + A: Open the Action Center
WIN + I:  Open Settings app
WIN + S: Search Windows, Internet via keyboard
WIN + C: Search Windows, Internet using voice
WIN + D: Reveal the Desktop
WIN + E: Open Windows Explorer
WIN + L: Lock the device 
WIN + R: Run a Command
WIN + P: Project the current screen
WIN + Space: Change the input Language
WIN + SHIFT + LEFT or RIGHT: Move the current window to another screen
WIN + 1 or 2 or 3 ...:  Open a program pinned to the task bar
WIN + TAB: Open Task View
WIN + Arrow Key: Move a Window in that direction
WIN + CTRL + LEFT or RIGHT: Move Between virtual desktops
WIN + CTRL + F4: Shut down the current desktop
WIN + CTRL + D: Make a new virtual deaktop
ALT + TAB: Move to previous window
ALT + SPACE: Move, Resize etc. a current window
ALT + F4: Close the current window

For More New Trick Visit Us: www.makeeasycomputer.blogspot.in

Posted by Unknown at 16:18:00 No comments:
Email ThisBlogThis!Share to XShare to FacebookShare to Pinterest

How To Setup Windows Defender To Automatically Scan On A Schedule

 To Set Windows Defender To Automatically Scan On Schedule 


Windows 8.x finally bundled an antivirus utility that used to be called Microsoft Security Essentials and rebranded it as Windows Defender. The only problem is that you can't easily setup automatic scheduled scans anymore.
We are guessing that they removed some of these features to make all of the other antivirus utilities happy, or maybe because theoretically real-time protection is all you need. Either way, you are probably reading this article because you want to setup a scheduled scan to run automatically.

Follow The Simple Steps To Perform A Scheduled Or Automatic Scan in Windows Defender:

Step 1: Open  the Task Scheduler. On start screen and search for "Schedule".

Step 2: Go to Task Scheduler Library > Microsoft > Windows > Windows Defender on left hand pane of the window.

Step 3: Double Click on the "Windows Defender Scheduled Scan". Choose the "Triggers" tab and press on "New" Tab.

Step 4: Set schedule now as per your convenience for an automatic scan in Windows Defender. There are variety of options to select from, starting from daily, weekly or even monthly.


For More Trick visit us www.makeeasycomputer.blogspot.in.
Posted by Unknown at 13:35:00 No comments:
Email ThisBlogThis!Share to XShare to FacebookShare to Pinterest

Saturday, 14 May 2016

How To Boot Into Windows 10 Safe Mode ON your PC

 To Boot Into Windows 10 Safe Mode On Your PC


Safe mode is troubleshooting option for Windows that starts your computer in a limited state, Only the basic files and drivers necessary to run Windows are started. Safe mode is useful for troubleshooting problems with programs and drivers that might not start correctly or that might prevent Windows from starting correctly.

If the system can't load the necessary configuration more than two times, the system will direct the display to Windows RE(Recovery environment).

Advanced Startup Options

Step 1: To begin, right click the start button and move the mouse over Shut down or sign out, which will reveal a bunch of power options.

Step 2: Hold down the Shift key and click the Restart option. This should reboot your computer straight into the Advanced options screens.
There's also an alternative way of accessing the Advanced options. Lauch the Settings app (Windows key + I) and navigate to Update & security > Recovery. You should see an Advanced startup option followed the Restart button. Click it.

Step 3: Your Windows powered machine will now boot into an option laden screen as seen below. Here, select Troubleshoot to continue.


Step 4: Without wasting further time, click Advanced options.


Step 5: Select (Startup Setting).


Step 6: Your PC will now automatically boot into another Startup Settings screen, with a bunch of startup options listed, Now click on Restart.


Step 7: You can select 4[Enable Safe mode] to enter the safe mode.


Step 8: The words Safe Mode appear in the corners of your monitor to identify which Windows mode you are using.


Posted by Unknown at 18:01:00 No comments:
Email ThisBlogThis!Share to XShare to FacebookShare to Pinterest

How To Speedup Your Data Transfer In Pendrive

To Speedup Your Data Transfer In Pendrive

A Pendrive is a portable Universal Serial Bus(USB) flash memory device for storing and transferring
audio, video, and data files from a computer.
As long as the desktop or laptop has a USB port, and the pen drive is compatible with the operating system, it should be easy to move the data from the hard drive to the device and to another computer  in a matter of minutes, The drive gets its name from the fact that many have a retractable port connector like a ballpoint pen, and they are small enough to fit into a pocket. Other names include Flash Drive, Jump Drive, and Thumb Drive. But many time it does not give well response while data transferring. So this time we come with small tips & tricks related to pen-drive.

Following Factors Responsible for Speedup Pen-drive Data Transfer:

  • Pendrive Ageing: When Device Becomes Old, The Rates Gets Slower.
  • Types of Files: File type it self indicate its rate of data transfer. Like songs, videos take more time as compared to text file. 
  • USB port version:  Use latest version always. If USB is 2.0 is the latest version, ans it's speed is 35mbps. So, if you want speed then buy 2.0 version pendrives.
Follow Simple Tricks To Speedup Pendrive Data Transfer Rate:
  • File system should be NTFS: Make sure you have NTFS as file system. Because its will makes your pen drive more faster. By Right clicking on your pendrive and selecting Format, Select NTFS File system, Uncheck Quick Format And Click On Start.
  • Disk Errors: If you can want to check disk errors then go to the properties of your pendrive, then select 'tools' tab. Click on 'check now'  button, click and press 'start' to fix the errors. 
  • Format: This is one of the useful option. When you have used your pendrive for quite a long time, then speed it up by formatting the device.
  • Device Policy: Go to properties of pendrive, open 'hardware' tab. Then select USB device from there pop up window where to change settings. Also get the best performance by clicking the option under 'hardware' tab.
These Tips & Tricks are more useful in your  future so carefully test your pendrive with the factors
given above to Speedup Pendrive.

Posted by Unknown at 14:41:00 No comments:
Email ThisBlogThis!Share to XShare to FacebookShare to Pinterest

Friday, 13 May 2016

How To Find When Was Your Operating System Installed Into Your Computer.

TO Find When Was Your Operating System Installed Into Your Computer.

Now, We back with new Trick and this time we can help you to find when was your Operating System installed in  to your system.
Did you ever got into a situation where you felt the need to check the exact date when did you last installed your Windows? if you are buying a second-hand PC then its very important to find this valuable information and from this information you can easily find that age of your system. This information also need to technician while fixing the problem of your PC. By applying few Commands on Windows Command Line interface.


Follow The Simple Steps To Find When Was Your Operating System Installed In To Your System.


  • Press Win+R to Open the command prompt then type cmd  and hit Enter.

  • Type the "systeminfo" commands into your command prompt and press Enter.


Once all the information is loaded up, scroll upwards to see the exact date and time under Oringinal Install Date as also illustrated by the screenshot above.


Posted by Unknown at 11:01:00 No comments:
Email ThisBlogThis!Share to XShare to FacebookShare to Pinterest

Thursday, 12 May 2016

Increase Battery Life of Laptop Easily : For Windows 7 And 8

Today we are going too see the post related to Laptop users for Laptop. Many people use the laptops. Some laptops give good battery backup for some days when you purchase. After 1 year the laptop don't give good battery backup. Today we are going to post how to increase the battery backup of the laptops. Many laptop always want the charging everytime. Sometime it is not possible to take the charger everywhere. Now you can get a good battery backup. Some of the laptop give the direct menu for battery as Power Saving Mode. If your laptop is having or not this option follow the steps below carefully and perform in your laptop.

Steps To Increase The Battery Life Of  Laptop :
  1. Go to Start and type CMD in the search.
  2. On the CMD application Right Click and click on Run As Administrator.
  3. In the command window type the command "powercfg -energy" (if you are Window 8 use "power /energy").
  4. Now hit the Enter.
When you hit Enter, windows will scan and try to increase the battery performance. After the command is executed, it will show one path that will create a HTML file in system32. You can go to the path and check the file.
Now you can easily increase the battery life of the latop.
Posted by Unknown at 14:01:00 No comments:
Email ThisBlogThis!Share to XShare to FacebookShare to Pinterest

Friday, 6 May 2016

Make your Computer Welcome You

This article describes exactly how you can make your computer welcome you like this.
With this trick, you can make your Computer welcome you in its computer welcome you in its computerized voice. You can make your windows based computer say "Welcome to your PC, Username".

Make Windows Greet you with a Custom Voice Message at Startup

To use this trick, follow the instructions given below:-

  1. Click on Start. Navigate to all Programs, Accessories and Notpad.
  2. Copy and paste the exact code given below.
  3. Replace Username with your own name.
  4. Click on File Menu, Save As, select All Types in Save as Type option, and save the file as Welcome.vbs or "*.vbs".
  5. Copy the saved file.
  6. Navigate to C:\Documents and Settings\All Users\Start Menu\Programs\Startup (in Windows XP) to C:\Users\ {User-Name}\AppData\Roaming\Microsoft\Windows\Start Menu\Programs\Startup (in Windows7,vista,8) if C: is your System drive. AppData is a hidden folder, So, you  will need to select showing hidden Folder option to locate it.
  7. Paste the File.


Now when the next time you start your computer, windows will welcome you in its own computerized voice.

Note: For best results, it is recommended to change sound scheme to No Sounds. 
You can change the sound scheme to No Sounds by following the steps given below:-
  1. Go to control Panel.
  2. Then click on Switch to Classic View. 
  3. Then click on Sounds and Audio Devices.
  4. Then click on the Sounds Tab.
  5. Select No Sounds from the Sound Scheme option.
  6. If you wish to save your Previous Sound Scheme, you can save it by clicking Yes in the popup menu. 
  7. Click on OK.
Change Sound Scheme to No Sounds


Try it yourself to see how it works, In my personal opinion, this is an excellent trick, Whenever I Start my PC in front of anybody and the PC welcomes me, the fellow is left wondering how brilliant a computer do I have.

Related: Make Your Computer Speak.

Posted by Unknown at 11:20:00 No comments:
Email ThisBlogThis!Share to XShare to FacebookShare to Pinterest

Thursday, 5 May 2016

Make Your Computer Speak

Have you ever concerned how can you make your computer speak whatever you input to it like in the movies? If you wish to know how to do this, then you have come to the right place. With this trick, you can create a script in windows which will make your computer speak whatever you input to it. 

To create one such talk script, follow the steps given below :-


Steps

  1. Open Notepad.
  2. Copy and paste the exact code given below.

  3. Click on File Menu, Save As, select All Types in save as Type option, and save the file as Speak.vbs or "*.vbs".
  4. Double click on the saved file, a window will open like the one in the one in the image. Enter some text in enter text column and click ok.
Now your Computer will speak / talk what you typed in Step 4. Try it yourself. 

Windows Compatibly: This VBS file can be executed on all versions including Windows XP, Windows Vista, Windows 7 and Windows 8.

Personel Experience: I personally showed this trick to many of my friends and they were literally left awestruck.You too can impress your friends by making your PC talk and be the Computer Wiz.

Related: Make Your Computer Welcome You!

Posted by Unknown at 15:11:00 No comments:
Email ThisBlogThis!Share to XShare to FacebookShare to Pinterest
Newer Posts Older Posts Home
Subscribe to: Posts (Atom)

Whatsapp Subscribe!

To get Latest Updates on Whatsapp. Send "Hi" to "8737082822" on Whatspp to Subscribe whatsapp broadcast services.

Search This Blog

Blog Archive

  • ►  2017 (4)
    • ►  January (4)
  • ▼  2016 (64)
    • ►  November (1)
    • ►  October (1)
    • ►  September (1)
    • ►  August (2)
    • ►  July (9)
    • ►  June (19)
    • ▼  May (16)
      • Enable Status Bar in Notepad on Windows 10/8/7
      • How To Reset Notepad To Default Settings on Window...
      • Notepad Tricks For Windows Users.
      • List Of Command Prompt Keyboard Shortcuts For Wind...
      • How To Hide Hard Drives( C:, D:, E:. etc.) Of Your...
      • Web Browsing Trick
      • Uninstall Programs Easily With These Third-Party U...
      • Windows 10 - How to enter BIOS configuration?
      • Windows 10 Makes Easier
      • How To Setup Windows Defender To Automatically Sca...
      • How To Boot Into Windows 10 Safe Mode ON your PC
      • How To Speedup Your Data Transfer In Pendrive
      • How To Find When Was Your Operating System Install...
      • Increase Battery Life of Laptop Easily : For Windo...
      • Make your Computer Welcome You
      • Make Your Computer Speak
    • ►  April (15)

About Me

Unknown
View my complete profile

Whatsapp Subscribe !

To get Latest Updates on Whatsapp. Send "Hi" to "8737082822" on whatsapp to Subscribe whatsapp broadcast services.

Total Pageviews

Watermark theme. Powered by Blogger.